No-Knead Gluten-Free Bread
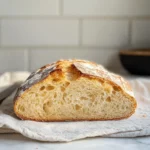
If you’re looking for a delicious and easy way to enjoy bread without gluten, my No-Knead Gluten-Free Bread recipe is perfect. This bread is not only fluffy on the inside but also has a delightful crispy crust on the outside. Whether you’re hosting a gathering or simply want to treat yourself, this bread fits the bill. You’ll love how simple it is to make, and its flavor will impress everyone—even those who aren’t gluten-free!
Why You’ll Love This Recipe
- Easy Preparation: No kneading required! Just mix, let it rise, and bake.
- Delicious Flavor: The combination of warm water and yeast creates a rich taste that everyone will enjoy.
- Versatile Uses: Perfect for sandwiches, toasts, or as a side for your favorite dishes.
- Dairy-Free Option: Ideal for those with dietary restrictions—no dairy or gluten here!
- Crowd-Pleaser: Even non-gluten-free eaters will love this hearty bread.

Tools and Preparation
Before diving into the recipe, gather your tools and prepare your workspace. Having everything ready makes the process smooth and enjoyable.
Essential Tools and Equipment
- Mixing bowls
- Baking dish with lid (or foil)
- Parchment paper
- Measuring cups and spoons
Importance of Each Tool
- Mixing bowls: Essential for combining ingredients efficiently without mess.
- Baking dish: A good quality baking dish ensures even cooking and helps achieve that perfect crust.
- Parchment paper: Prevents sticking and makes cleanup easy.
Ingredients
Here’s what you’ll need to make this delightful No-Knead Gluten-Free Bread:
- 1.5 cups warm water (370 ml)
- 1 teaspoon sugar (4 grams)
- 1/2 teaspoon active dry yeast (2 grams)
- 3 cups gluten-free flour (420 grams; I used Caputo)
- 1 teaspoon salt (5 grams)
How to Make No-Knead Gluten-Free Bread
Step 1: Activate the Yeast
- Add the warm water, sugar, and yeast into a bowl. Stir gently.
- Wait five minutes. If the yeast does not activate (bubbles form), repeat this step using lukewarm water.
Step 2: Prepare the Dough
- In a separate large bowl, combine the gluten-free flour and salt.
- Slowly add in the activated yeast mixture while stirring until you achieve a thick sticky dough.
Step 3: Let It Rise
- Cover the dough with plastic wrap or a clean cloth.
- Allow it to rest at room temperature for 5 hours away from drafts.
Step 4: Shape the Dough
- Lightly flour your counter surface.
- Pour out the risen dough onto the floured surface.
- Flour the top of the dough gently and shape it into an oval ball—no kneading necessary!
Step 5: Bake Your Bread
- Transfer your shaped dough into any baking dish lined with parchment paper.
- Cover with a lid or double foil if no lid is available.
- Place in a cold oven, set it to 450°F (232°C), and bake for 40 minutes without preheating.
Step 6: Finish Baking
- After 40 minutes, uncover your bread dish.
- Bake for an additional 30 minutes or until golden brown all over.
Step 7: Cool Down
- Remove from oven and let cool for about 5 to 10 minutes before slicing.
- Enjoy your freshly baked No-Knead Gluten-Free Bread!
This recipe yields about 10 slices, making it perfect for sharing or meal prepping throughout the week! Happy baking!
How to Serve No-Knead Gluten-Free Bread
No-Knead Gluten-Free Bread is versatile, making it perfect for various occasions. You can enjoy it as a standalone snack or pair it with different dishes for a delightful meal.
With Olive Oil and Balsamic Vinegar
- Drizzle some high-quality olive oil and balsamic vinegar for a simple and flavorful dip.
As Sandwiches
- Use slices of this gluten-free bread to create delicious sandwiches filled with your favorite ingredients, from turkey to roasted veggies.
Toasted with Avocado
- Top toasted slices with smashed avocado, a sprinkle of salt, and chili flakes for a healthy snack or breakfast option.
Accompanying Soups
- Serve warm slices alongside hearty soups like tomato basil or butternut squash for a comforting meal.
With Hummus
- Spread hummus on toasted pieces of bread for a nutritious appetizer that packs flavor and texture.
For Breakfast Toasts
- Create sweet breakfast toasts by adding peanut butter and banana or ricotta with honey and berries.
How to Perfect No-Knead Gluten-Free Bread
Getting the perfect loaf of No-Knead Gluten-Free Bread can be achieved with some simple tips. Here’s how you can ensure your bread turns out amazing every time.
- Use the right flour: Stick to Caputo’s Gluten-Free Flour for the best results, as other flours may alter the texture.
- Check water temperature: Make sure your water is lukewarm. Too hot or too cold can affect yeast activation.
- Allow ample resting time: Let the dough rest at room temperature for at least 5 hours to develop flavor and rise properly.
- Avoid over-flouring: While shaping, use just enough flour on your hands and the counter to prevent sticking without drying out the dough.
- Monitor baking time: Keep an eye on the color of your bread. It should be golden brown when done; adjust your baking time if necessary.
- Cool before slicing: Allow the bread to cool completely before cutting to maintain its structure and moisture.
Best Side Dishes for No-Knead Gluten-Free Bread
Pairing your No-Knead Gluten-Free Bread with side dishes can elevate any meal. Here are some ideal options to consider.
-
Garden Salad
A fresh mix of greens, tomatoes, cucumbers, and dressing complements the bread nicely. -
Roasted Vegetables
Seasonal roasted veggies like carrots, zucchini, and bell peppers provide a hearty side full of flavor. -
Chili
A warm bowl of chili pairs perfectly with this gluten-free bread, soaking up all the delicious juices. -
Cheese Platter
A selection of cheeses can provide a delightful contrast in texture and taste when served alongside the bread. -
Stuffed Peppers
Colorful stuffed peppers filled with rice or quinoa offer a filling side dish that matches well with gluten-free bread. -
Grilled Meat Skewers
Marinated chicken or vegetable skewers add protein and flavor, enhancing your overall meal experience. -
Pasta Salad
A chilled pasta salad featuring Italian dressing makes for a refreshing dish that works well with warm slices of bread. -
Sautéed Greens
Sautéed spinach or kale provides a nutrient-rich side that balances beautifully with the flavors in your gluten-free loaf.
Common Mistakes to Avoid
Making No-Knead Gluten-Free Bread can be simple, but there are common pitfalls to watch out for. Here’s how to avoid them.
- Incorrect water temperature: If the water is too hot or too cold, the yeast won’t activate properly. Always use lukewarm water for the best results.
- Not measuring ingredients accurately: Baking is a science. Use precise measurements, especially for gluten-free flour, to ensure your bread turns out perfect every time.
- Ignoring resting time: Skipping the resting period will affect the texture and rise of your bread. Allow it to rest for at least 5 hours for optimal fluffiness.
- Using the wrong type of flour: Not all gluten-free flours are equal. Stick to a recommended brand like Caputo’s for consistent results.
- Preheating the oven: Putting the bread in a preheated oven can ruin its texture. Always place it in a cold oven and then turn it on.
- Not letting it cool properly: Cutting into your bread too soon can make it gummy inside. Let it cool for at least 5-10 minutes before slicing.

Storage & Reheating Instructions
Refrigerator Storage
- Store leftover No-Knead Gluten-Free Bread in an airtight container.
- It can last up to 3 days in the refrigerator without losing freshness.
Freezing No-Knead Gluten-Free Bread
- Wrap slices or whole loaves tightly in plastic wrap, then place them in a freezer bag.
- It can be frozen for up to 3 months. Make sure to label with the date!
Reheating No-Knead Gluten-Free Bread
- Oven: Preheat to 350°F (175°C) and warm slices for about 10 minutes for a crispy crust.
- Microwave: Heat slices on medium power for about 15-20 seconds, keeping them moist with a damp paper towel.
- Stovetop: Toast slices in a skillet over medium heat until golden brown on both sides.
Frequently Asked Questions
Here are some common questions about making No-Knead Gluten-Free Bread.
Can I use any gluten-free flour?
You can try other brands, but results may vary. I recommend sticking with Caputo’s flour for best outcomes.
Why is my dough too wet?
If your dough is overly sticky, you might need to add more flour until you achieve the right thick consistency.
How long does this bread stay fresh?
No-Knead Gluten-Free Bread stays fresh in the refrigerator for about three days and up to three months if frozen.
Can I customize this recipe?
Absolutely! You can add herbs, seeds, or spices to customize flavors according to your preference.
Is this recipe suitable for beginners?
Yes! This No-Knead Gluten-Free Bread recipe is beginner-friendly and doesn’t require advanced baking skills.
What can I serve with this bread?
This bread pairs well with soups, salads, or spreads like hummus and butter for a delightful snack.
Final Thoughts
No-Knead Gluten-Free Bread is not just easy; it’s also incredibly delicious and versatile. You can enjoy it as toast, sandwiches, or simply with butter. Feel free to experiment with flavors and ingredients to make this recipe your own!
No-Knead Gluten-Free Bread
No-Knead Gluten-Free Bread is a game-changer for anyone craving a hearty, delicious loaf without gluten. This simple recipe requires no kneading, making it perfect for both novice and experienced bakers. With a fluffy interior and a beautifully crispy crust, this bread is not just gluten-free—it’s utterly delightful! Serve it with your favorite spreads, use it to create mouth-watering sandwiches, or enjoy it alongside soups for a comforting meal. The ease of preparation and the impressive flavor profile will have everyone asking for seconds, regardless of their dietary preferences.
- Prep Time: 15 minutes
- Cook Time: 70 minutes
- Total Time: 1 hour 25 minutes
- Yield: Approximately 10 servings 1x
- Category: Bread
- Method: Baking
- Cuisine: Gluten-Free
Ingredients
- 1.5 cups warm water
- 1 teaspoon sugar
- 1/2 teaspoon active dry yeast
- 3 cups gluten-free flour
- 1 teaspoon salt
Instructions
- In a bowl, combine warm water, sugar, and yeast; let sit for 5 minutes until foamy.
- In another bowl, blend gluten-free flour and salt; add the yeast mixture to form a thick dough.
- Cover the dough and let it rise at room temperature for 5 hours.
- Shape the risen dough into an oval ball on a floured surface.
- Place in a parchment-lined baking dish; cover and bake in a cold oven at 450°F for 40 minutes, then uncover and bake for an additional 30 minutes until golden brown.
- Allow cooling before slicing.
Nutrition
- Serving Size: 1 serving
- Calories: 150
- Sugar: 0g
- Sodium: 260mg
- Fat: 1g
- Saturated Fat: 0g
- Unsaturated Fat: 0.5g
- Trans Fat: 0g
- Carbohydrates: 32g
- Fiber: 3g
- Protein: 3g
- Cholesterol: 0mg